Customers
Word-of-mouth marketing can be implemented through your customers so the system offers the CRM function for you to use the information for better marketing, have specific information of your customers (e.g their preferences, allergies) which the customers will always appreciate. In this section we'll cover on how to use "CRM" step-by-step.
-
All customers (segments)
To enter the customer list section:
-Go to "CRM" under "Main Menu"
-Go to "Customers" under "CRM" Picture - (1)
The list can be filtered to each type of member and prepaid card's information.Picture - (1)
By creating a customer database the customer history is saved automatically to the system. If you would need the information such as what was their order, who served them, how much did we charge them you can look at their history by pressing the icon under the history tab.
The list has a search engineThe customer's can be added to 4 different types:
1. On account (a privilege to pay the bill later)
2. Deposit (if the customer makes a deposit this box should be checked)
3. FOC (a privilege of having the menu items free of charge)
4. Prepaid (prepaid cards - a card that the customer can top up and use as payment for their bill)
Note: one customer can be added as several and/or all type of member simultaneously. Or you can leave this option upon adding a customer to the database.*ICON EXPLANATION
(Explanation of the icons from left to right)
1. 3 horizontal lines - Main Menu
2. Search bar - search engine
3. Active/Inactive - a customer can be inactivated by you (e.g. if the customer stopped coming to your establishment). To inactivate a customer:
-Go to the customer that you wish to inactivate
-Swipe the tab to the left
-You'll see "Inactivate" on the red background
Note: customers added to the database cannot be deleted, even if the customer is "Inactivated" However the list is divided into "Active" and "Inactive" list for your convenience.
4. A person icon with horizontal lines on the background - detailed "On account bills"
5. Wallet with a check mark - detailed "Deposit bills"
6. FOC icon - detailed "FOC Bills" -
Add customer
APP VERSION:
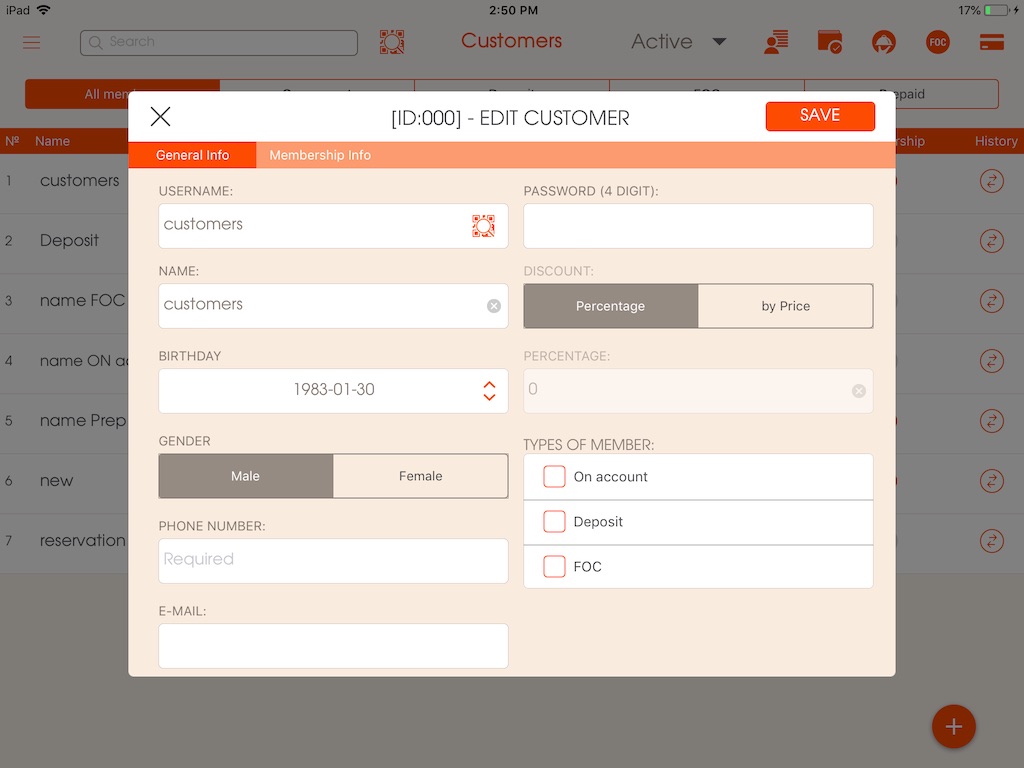
To add a new customer to the database:Picture - (1)
*GENERAL INFO
- Go to "CRM" section in the Main Menu
- Click on the "Customers" under "CRM" (Picture - 046)
- Click the + (plus) icon on the bottom right corner of the screen
- A pop-up window will appear with the title "Add Customer"
*Please fill in the mandatory fields. (The following instructions will be given on every field, you can choose to leave the optional fields that you think is unnecessary)
- Enter username (type or scan by barcode)
- Enter the name of the customer
- Enter their birthday, phone number & e-mail address
- Enter the password
- Choose whether the discounts will be given to the customer by "Percent" or by "Amount"
- If you chose "Percent" insert the amount of percentage in the bracket below/ If you chose "Amount" insert the amount in the bracket below.
- Check which type of customer (on account, deposit or FOC)
Note: one customer can be added as several and/or all type of member simultaneously. Or you can leave this option upon adding a customer to the database.
*MEMBERSHIP INFO - This section will show you the customer's membership type, the amount in their card, redeemable points etc.
*PREPAID INFO - This section will show you the customer's prepaid card information such as card serial number, when it was activated, amount, discount, current balance etc.After you've filled the required fields press "Save" to create a new member in the database.
-
Edit customer
-To edit customer information long press on the tab.
-Make the necessary changes and click "Save"Picture - (1)
